How to Upload High Poly Models to Second Life
Level Of Detail
Level of Item (LOD) is the mechanism by which 2d Life lowers an object's visual detail by increments as the camera gets further away. When uploading a mesh model, we accept consummate control over the amount of detail at each level.
- The uploader supports four levels of detail.
- The uploader automatically generates lower LODs suitable for preview or rough import. You can achieve smoother transitions between levels by creating your own lower LOD models.
- LOD alternative (the viewing distance at which the detail levels modify) is affected past an object'south scale. A large object shows a higher LOD than a smaller object at the same altitude. Recall this when creating your LOD models and when uploading.
- The uploader allows the aforementioned file to be used in multiple LOD level slots. This is useful for ensuring particular on smaller objects only use it wisely; using a highly detailed model in all slots can adversely touch on the model'south state impact and rendering functioning.
- Make certain the bounding boxes of all the LOD models are identical in size. This prevents the object from changing its scale equally information technology transitions through the LOD levels. Most modeling applications offer ways to view the bounding box of multiple objects at the aforementioned fourth dimension.
- Each LOD model must retain all the materials of the highest detailed model. If your model has viii materials, and so must all your LOD models. Ignoring this will result in unpredictable texture location changes. Ignoring the materials requirement won't stop the uploader. If you have a model that is displaying textures improperly, look closely at the materials in your LOD files.
- A general guideline for creating LOD models is to reduce the triangle count by 50%-75% at each level. For example: If the most detailed model is 400 triangles, the adjacent level should be no higher than 200 triangles. The next level should be no higher than 100, and the lowest should be near or beneath l triangles.
Uploading a mesh model step by step on the Second Life Knowledge Base: Uploading a mesh model
Brief Uploader LOD section walk through
Uploader Generated LODs
- Choose Build > Upload > Model... from the top menu bar.
- In the High file slot click Scan, then select the .dae file on your computer and click Open.
- Click on the Medium level slot to highlight that level. Highlighting any level displays that level's model in the Preview pane. Use the up and downwards arrows on each level to raise or lower the triangle count until satisfied with the transition between the LODs.
- Click Calculate weights & fee and come across if you similar the Land Impact count, just don't upload withal! We still demand to arrange the model'due south physics backdrop.
For total details on Triangle Limit and Fault Threshold, come across Upload Model UI reference.
User created LOD files
- Choose Build > Upload > Model... from the top carte bar.
- In the High LOD slot load the highest detailed model as described above.
- In the Medium slot load the second highest LOD model.
- In the Low file slot load the second to lowest LOD model
- In the Lowest slot load the lowest LOD model.
- Click Summate weights & fee and see if yous similar the Country Bear on count, but don't upload nonetheless! Nosotros withal need to adjust the model's physics properties.
Physics
2nd Life supports custom physics shapes, which tin can be uploaded with a mesh object or uploaded independently. This allows for the creation of a visually complex object that has a low physics weight. For Havok's official (and extremely technical) best practices in creating physics shapes, see All-time practices for creating efficient collision volumes in the Second Life Knowledge Base of operations.
Havok Physics tips and oversimplifications
Havok LOVES cubes, and here is why: Havok is optimized to procedure cubes virtually instantaneously. Conversely, when Havok encounters an object more than circuitous than a cube(even a hollow or cut cube) information technology and then has to count every single triangle on that object and ponder what to practise with each one. So keep those physics shapes every bit simple as possible!
Here are some guidelines for creating physics shapes for various types of projects:
- For large, concave shapes (like a house), use a custom physics mesh with a minimal triangle count. The larger the triangles used in the physics mesh, the lower the physics cost.
- For very simple objects that don't need precision standoff shapes (similar the trunk of a tree), try using a trivial physics shape like a box. For more data on this method, see Physics Optimization.
- For intermediate objects that are too minor to efficiently utilise a custom physics mesh but need a fairly accurate collision model, use the physics tab of the mesh uploader as described beneath.
Physics shapes and how they relate to mesh uploads and LOD
Here are step-by-pace instructions on using the physics tab of the mesh uploader.
This tab allows nearly space flexibility. Hither is a quick description of the uploader physics tab. This is redundant merely is needed to illustrate the importance and usefulness of the Clarify button.
Step i: Level of Item
- You can assign any of your LOD levels every bit the physics shape.
- Or insert a new file for the physics shape.
- Or generate the physics shape right there in the uploader.
Step ii: Analyze
- A mesh physics shape uploaded without using the Analyze push button will result in the faces beingness double sided inworld. For instance: a unmarried plane volition upload every bit a double sided wall. A cube volition upload every bit a hollow box. This is useful for creating simple shapes, only also risky as it can create areas that will trap avatars and other physical objects.
- Pressing the Analyze button generates a set of convex shapes (shapes with no holes or depressions) that approximates the original mesh shape; these convex hulls create a physics shape that acts as a volume. Avatar or concrete objects stuck inside an Analyzed physics shape are neatly pushed out of the book by Havok.
Step iii: Simplify
- From hither you can simplify.
- Close holes in more complex shapes. This is useful when using an LOD level for the physics shape.
The goal should always be a the simplest physics shape possible. Use the uploader tools hither to proceed the geometry and physics count every bit low every bit possible.
UV mapping
Anyone who has used the Build Tools inside of 2nd Life already understands UV mapping, but maybe under different terminology. UV mapping is just setting texture repeats(U and V) and offsets. If y'all expect closely at the Build Tools Texture tab you'll see that U and V are used for the texture kickoff values already. Lean on that familiarity and this concept will come more easily.
General UV mapping techniques
Standard UV mapping
The well-nigh mutual UV map technique divides the mesh surface into neatly flattened sections. Nigh 3D modeling software packages take this functionality built in.
UV mapping this way has advantages and disadvantages:
- The shapes created usingthis UV mapping technique makes it easier to visualize how the texture will use inworld, which makes modifying and drawing on the texture easier.
- Most 3D modeling software packages tin can be used to generate cute textures using this mapping technique(in conjunction with Projection mapping, scene lighting, etc.).
- The disadvantages become credible with larger or very complex objects. 1 merely runs out of pixels(or texture space) if trying to flatten a circuitous object onto one UV map. Instead, big objects often need a seamless repeatable texture.
Projection UV mapping
Projection UV mapping is much similar applying textures to a prim object inworld, the goal of projection UV mapping is to scale, rotate, and offset a diffuse texture so the object wears it perfectly.
- The reward of projection UV mapping is versatility. A house UV mapped this manner can habiliment whatever number of standard wall, roof, or trim textures.
- The texture can be repeated and offset.
- The texture can be animated.
Disadvantages:
- Potential for texture size overuse inworld.
- Models uploaded with projection UV maps tin not have reward of modeling software'due south texture baking adequacy.
Baking textures
An advanced feature of almost modeling software packages uses both the Standard UV map and the project maps to render an image. This is sometimes referred to as "blistering" a texture. The goal is to use all the texture data stored in the Projection maps to create an epitome that fits the Standard UV map. This render tin can be influenced past any lighting or other objects in the scene.
Texture Faces
- Second Life'south COLLADA mesh uploader supports upward to 8 separate texture faces.
- Each LOD model must all accept the same number of Texture faces.
- All the separate faces need to apply the aforementioned UV map.
- Each modeling software handles this slightly differently. Assigning unlike areas to unlike materials archives split Texture faces on an uploaded Mesh in some modelers, and assigning areas to divide textures achieves this in others. Here are some examples of application specific information.
Normals
A normal is something that is perpendicular to a aeroplane. For the scope of this article, normal describes the direction a face is pointing. Most 3D renderers, the Second Life Viewer included, smartly render but one side of a face. This saves cycles just assumes model is manifold (enclosed in a way that won't encourage views inline with the normal, or are double sided where needed)
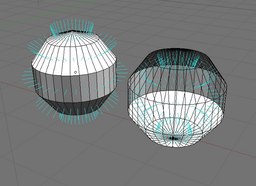 Two spheres. Left: Normals pointing out, Right: Normals pointing in.
Smoothen Normals
In the case of a round or curved multiple face up surface, a normal boilerplate tin exist used. A normal average allows inexpensive surface smoothing. Unremarkably known every bit "smoothen normals" or "smooth shading", it is an invaluable tool when creating depression polygon Second Life content. Smooth normals let fewer faces to appear as a visually smooth surface, requiring far fewer faces. For case, a five-sided cylinder with smoothen normals can appear completely round in Second Life. In some cases, a even a three-sided cylinder tin can appear perfectly round.
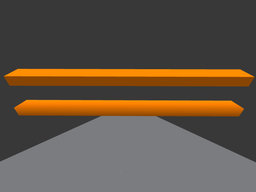 | 2 five-sided cylinders. Superlative: Solid normals. Bottom: Polish normals. Annotation where both cylinders intersect the walls, they show the profile of the bodily geometry. |
 | Applying shine normals to some areas and not to others can be useful for calculation detail or highlighting edges. |
Low polygon modeling
It is important to retrieve that Hollywood-quality digital models are extremely plush to use in Second Life. Real-time rendering means Second Life must stream triangles and data near the speed of light. Brand sure each and every polygon and bit counts! There are many low polygon modeling techniques and software-specific tutorials and tools available effectually the spider web.
The goal is to relieve every triangle you can on the model you plan to upload:
- Ensure that any flat surface uses the smallest number of triangles possible.
- Use smooth normals to "fake" smooth curved surfaces.
- Use depression polygon rendering tricks to broil detailed textures, which can provide the illusion of more than geometric detail.
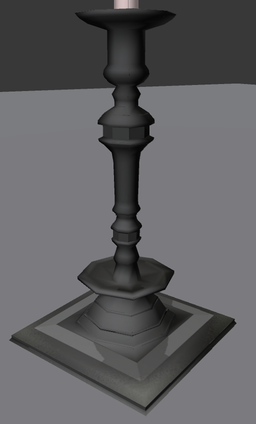
Low polygon texture blistering tricks
It is possible to create a very highly detailed model and utilise it to return gorgeous textures on the faces of a very simple low polygon (2nd Life friendly) version. In this case, the name "low polygon modeling" sounds slightly deceptive because you lot will model and render a very high polygon scene for the purposes of creating the textured illusion. However, the final product is a very efficient, low-polygon model with very detailed textures mapped onto it.
Most modeling software packages have features built in to facilitate this technique.
Source: https://wiki.secondlife.com/wiki/Mesh_and_LOD
Publicar un comentario for "How to Upload High Poly Models to Second Life"